Cakewalk // Documentation // SONAR X2 // Changing track settings
Table of Contents Previous Next Index

Controlling playback ► Changing track settings

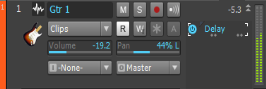
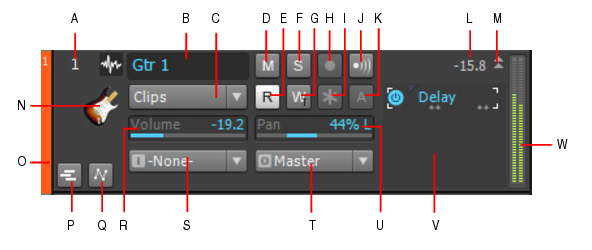
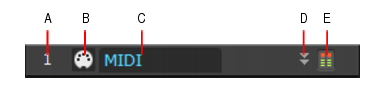
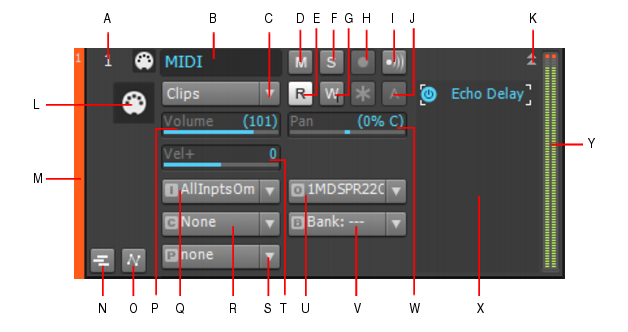
Each track in a project contains MIDI or audio information and has a variety of settings (also called parameters) that determine how the track sounds. By changing these parameters, you can change the sound of your project. For audio tracks, you control parameters such as volume, stereo panning, and the output device that is used to produce the sound. For MIDI tracks, you control many additional parameters, including the type of instrument sound that is used to play the notes stored in the track. Both kinds of tracks contain an Automation Read button and an Automation Write button , which enable or disable automation playback and recording, respectively.
Note 1: You can control all sliders and knobs in the Console and Track views by clicking a control, then hover over it with the mouse and manipulate the mouse wheel. If you move the mouse cursor away from the slider or knob while using the mouse wheel, you will lose control of the slider or knob you are adjusting.
Note 2: You can show and hide controls in track and bus strips in the Track view, and even create presets for your favorite control layouts. For details, see Configuring Track view controls for more information.
The following figures show the various parameters in audio track strips. The figures are of an audio track that is located in the Track view, however most of these parameters can also be adjusted in the Console view and Track Inspector. Some parameters are only available in the Console view or Track Inspector.
Figure 45. Audio track
A. Track number B. Header icon C. Track name D. Peak value E. Maximize/restore F. Meter
A. Track number B. Track name C. Edit Filter D. Mute E. Automation Read F. Solo G. Automation Write H. Arm for recording I. Freeze J. Input echo K. Archive L. Peak level M. Expand/collapse track N. Track icon O. WAI display P. Expand/collapse Take Lanes Q. Expand/collapse Automation Lanes R. Volume slider S. Input T. Output U. Pan slider V. Effects bin W. Meter
A. Enable/disable plug-in B. Plug-in name C. Right-click to insert new plug-in
Table 22.  
A name that you assign the track for easy reference. Note that if you do not assign a name to a track, the default name is the track number. This track number will change if you change the order of your tracks.
The stereo distribution of the output, ranging from 100% left (hard left) to 100% right (hard right); a value of “C” indicates sound that is centered left-to-right. On stereo tracks, pan acts as balance.
Trim (volume trim) (Track Inspector and Console view only)
For example, let’s say you have four tracks, three tracks have their volume fader set to 0 dB while the fourth track’s fader is set to +10 dB. You want to group the faders and do a slow fade out, but the slightly higher level of the fourth track causes its volume to be higher in relation to the other tracks towards the end of the fade out. To balance the fader levels, reduce the fader level for the fourth track to 0 dB and raise the Volume Trim value for that track to +10 dB. The resulting volume levels for the project are the same, but now you can group the faders and perform a fade out with no track standing out disproportionately at the end of the fade out.
Send Enable (Track Inspector and Console view only)
Send Level (Track Inspector and Console view only)
Send Pan (Track Inspector and Console view only)
Send Pre/Post switch (Track Inspector and Console view only)
Pre (pre-fader) means that the Send signal goes to the bus prior to the track’s volume fader; post means the Send signal goes to the bus after the volume fader.
Send destination (Track Inspector and Console view only)
Mono/Stereo (Track Inspector and Console view only)
A switch that determines whether a track’s signal enters an effect or chain of effects as mono or stereo, regardless of the nature of the track.
Phase In/Out (Track Inspector and Console view only)
A. Track number B. Header icon C. Track name D. Maximize/restore E. Meter
A. Track number B. Track name C. Edit Filter D. Mute E. Automation Read F. Solo G. Automation Write H. Arm for recording I. Input echo J. Archive K. Expand/collapse track L. Track icon M. WAI display N. Expand/collapse Take Lanes O. Expand/collapse Automation Lanes P. Volume slider Q. Input R. Channel S. Patch T. Velocity+ U. Output V. Bank W. Pan slider X. Effects bin Y. Meter
A. Track scale B. MIDI effects bin
Table 23.  
A name that you assign the track for easy reference. Note that if you do not assign a name to a track, the default name is the track number. This track number will change if you change the order of your tracks.
The stereo distribution of the output, ranging from 100% left (hard left) to 100% right (hard right); a value of “C” indicates sound that is centered left-to-right.
Velocity trim (Track Inspector and Console view only)
Ch (channel) (Track Inspector and Console view only)
Bank (Track Inspector and Console view only)
Patch (Track Inspector and Console view only)
Snap to Scale scale type (Track Inspector only)
Table 24.  
You can customize which tracks are displayed or not displayed, and enlarge or maximize individual tracks while other tracks remain minimized. You can also manually set the exact size of a track’s display. The following table shows how to customize the appearance of tracks in the Track pane.
Table 25.  
Open the Track Manager dialog box (press H), and check or uncheck a track’s check box in the dialog box.
Click the Expand/collapse button in the track
Move the cursor over the gap below a track until the cursor looks like this . Click and drag until the track is the size you want.
You can display subsets of the Track pane’s controls (the titlebar controls are always displayed) by selecting a Control preset from the Track Control drop-down list above the track strips. To choose which controls are displayed in track strips, see Configuring the display of tracks in the Track view.
Table 26.  
Click on the black arrow on the right of the control and select a driver from the menu that appears, or double-click on the control and select a driver from the menu.
list-image
To adjust the same control in all selected tracks of the same type, hold down the CTRL key and adjust a control in any selected channel strip.
For example, to assign a group of tracks to the same output, select the tracks you want to assign, then hold down the CTRL key and assign the Output control in any selected track. All selected tracks will be assigned to the same output.
All track parameters are saved with a SONAR project. However, if you export a project to a standard MIDI File, several of the parameters (Key+, Vel+, Time+, and Chan) are applied to the MIDI data as the file is being exported. Other parameters, including Input, Output, Mute, Solo, and Archive, are lost when you export the project to a MIDI file.The following sections contain more information about many of the parameters in the Track view. For more information about the track inputs and the track Arm button, see Preparing to record.

Copyright © 2024 Cakewalk, Inc. All rights reserved
Sitemap | Privacy Policy | Legal